☁️ Git guidelines
This page explains how we use branches, pull requests, and commit messages in Flowcontrol.
Use this page for the team workflow around git.
Use these related pages for the surrounding release process:
💬 Commit messages
Committing code is an essential part of development. Good commit messages make it easier to understand changes, review history, and trace regressions.
We follow our own practical interpretation of Conventional Commits.
The baseline rules are:
- use a commit type
- add a scope
- write a short descriptive title
- add a body when the title alone is not enough
Examples
chore(docs): Update deployment guidelines
feat(login): Add login button to homepage
fix(api): Prevent crash in farmer controller
Reworked the controller and aligned the service and repository flow
🌿 Branching
Flowcontrol uses a tiered branch model:
development: main integration branchstaging: protected pre-release branchmaster: protected production branch
🔨 development
development is where normal feature work comes together.
Preferred team workflow:
- create a feature branch from
development - do the work on that branch
- open a pull request back into
development
Important:
- direct pushes to
developmentare technically possible - even so, the preferred team workflow is still feature branch plus pull request
🧪 staging
staging is the release-candidate branch.
Use it to test what is likely to go to production next.
Rules:
- no direct feature work on
staging - no direct pushes by normal workflow
- merge
developmentintostagingthrough a pull request
🚀 master
master is the production branch.
Rules:
- no direct feature work on
master - no direct pushes by normal workflow
- merge
stagingintomasterthrough a pull request
Merging into master is a production release action.
📋 Workflow summary
- feature work starts from
development - release candidates move from
developmenttostaging - production releases move from
stagingtomaster
This keeps day-to-day feature integration, release testing, and production rollout separated.
✏️ Naming branches
Use short descriptive branch names in kebab-case.
Example:
upload-imagesfix-farmer-distribution-filterdocs-deployment-guide
🔀 Pull requests
The pull request flow depends on the target branch.
🔨 Pulling into development
After finishing work on a feature branch:
- Create a pull request from your feature branch into
development. - Name the pull request
<feature-name> into development. - Add a short description when the title alone is not enough.
- Prefer
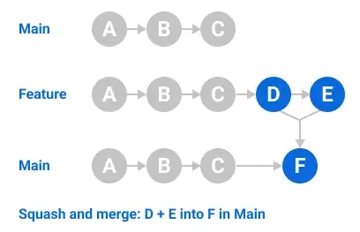
Squash and mergeto keepdevelopmenthistory readable.
What squash and merge does
When you squash and merge a pull request, Git combines the commits from the feature branch into a single commit on the target branch.
This removes the fine-grained branch history from the target branch, but keeps the main branch history cleaner and easier to scan.
🧪 Pulling into staging
When a set of changes on development is ready for release testing:
- Create a pull request from
developmenttostaging. - Name the pull request
development into staging YYYY-MM-DD. - Add a summary of the release candidate. Do not paste a file-by-file changelog.
- Wait for the protected-branch CI validation to pass.
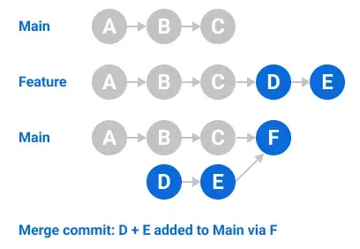
- Merge using
Create a merge commitso the release history stays aligned betweendevelopmentandstaging.
Important:
- the PR into
stagingis validation-only - images are not published from the PR itself
- after the PR is approved and merged, the push to
stagingpublishes staging image tags - Portainer then auto-deploys the staging rollout from those published tags
What create a merge commit does
When you create a merge commit, Git creates a new commit that combines the source branch into the target branch while preserving both histories.
This is useful for release branches because it keeps the relationship between development, staging, and master visible in git history.
🚀 Pulling into master
Create a pull request to master only when the release has been tested on staging and is ready for production.
This is a production release step.
Caution
Merging into master triggers the production release path.
Before pulling into master
- Prepare the release changelog and known issues.
- Export Keycloak changes and commit them when needed.
- Update the root
pom.xmlrelease version (<revision>). - Make sure the deployment configuration is aligned:
APP_VERSIONIMAGE_TAG
- Optionally align your local
.envAPP_VERSIONfor consistency. - Inform the team about the release version change when that affects local work.
When merging staging into master, follow these steps:
- Create a pull request from
stagingtomaster. - Name the pull request
staging into master Vx.x.x.x. - Add a summary of what is being released.
- Assign one of the expected reviewers.
- Wait for approval and protected-branch CI validation.
- Merge using
Create a merge commit.
Important:
- the PR into
masteris validation-only - the actual image publish happens after merge on the resulting push to
master - the publish workflow pushes immutable version tags to GHCR
- production is then updated manually in Portainer
- set
APP_VERSIONandIMAGE_TAGto the intended release version - trigger the Portainer stack update so production pulls that released image version
✅ Recommended rule
Keep these mental boundaries clear:
- git flow decides how code moves between branches
- GitHub Actions validates and publishes images
- Portainer and Swarm handle runtime deployment
If you are changing the release process, also check: