🔒 Security (BE)
This research section is goes over how the security of the back-end is implemented. This also covers a bit of how the front-end can authenticate with the back-end.
️🔑️ Keycloak & OAuth2.0
When it comes to securing the system, we have chosen to implement "OAuth2" as a security protocol. This is a standard used by many companies and developers. To ensure that this OAuth2.0 implementation is secure, we have chosen to work with Keycloak. Keycloak is an open-source identity and access management solution. It offers you the possibility to give the Authentication and Authorization processes out of hand. Since we have implemented the OAuth2.0 protocol, we have the option of choosing between several different authorization grants, such as:
- Authorization Code Grant (+ PCKE)
- Implicit Grant
- Resource Owner Password Credentials Grant
- Client Credentials Grant
When it comes to choosing the correct authorization grant, it is dependent on the Front-End. Since our Front-End is a Single Page Web Application, we have chosen to use the Authorization Code Grant (+ PCKE).
Keycloak runs in a docker container and is available on port '8180' (for development). Here you can log in with the admin CLI credentials and choose the Flowcontrol realm. Once the realm is selected, the user can:
- CRUD Realm roles
- CRUD Users
- Select the flow-control client where the OAuth2.0 protocol and other FE related values can be configured.
- Manage required user actions
- And a lot more: see documentation for possibilities
📜 SSL configuration
To ensure that the communication between the Front-End and the Back-End is secure, we have chosen to implement SSL certificates. The following diagram shows the general SSL handshake:
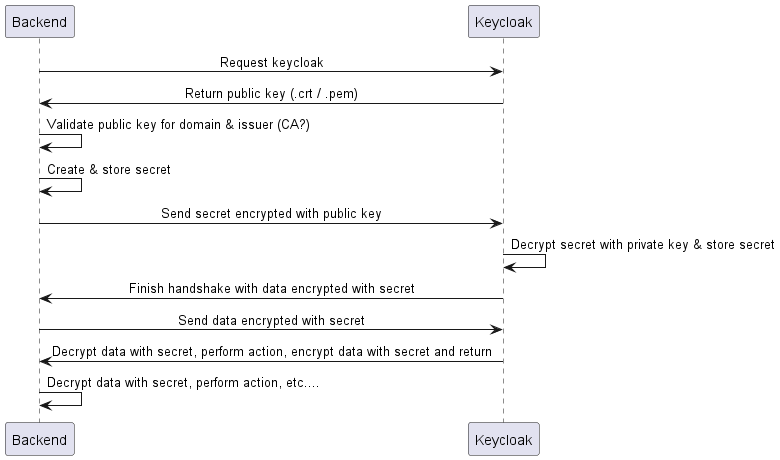
As you can see in the diagram, there is a module requesting another module. The model that is being requested is the module that holds the certificates. These certificates are made up of a public and private key (as can be seen in the diagram). The public key is used to encrypt a secret, which can only be decrypted by the private key. Meaning that if one of our back end modules wishes to contact Keycloak, it will need to request the public key of Keycloak. It can encrypt a secret and send it to Keycloak. Keycloak will then decrypt the secret with its private key and will use the secret to encryp all data sent back and forth. The only way to decrypt this data is by having the secret. The secret gets made by 1 module, the other receives it encrypted and can use its private key to decrypt it.
🌀 Nginx reverse proxy
The application is served by an Nginx reverse proxy. This reverse proxy runs in from of everything in our docker setup. This reverse proxy is used to handle the SSL certificates and to forward the requests to the correct module. There are only 2 locations where certificates are needed:
- The reverse proxy itself
- The Keycloak module
Keycloak needs certificates to run in production mode. The reverse proxy needs certificates to ensure that the communication between the user and the reverse proxy is secure.
📜 Self-signed certificates
During the development and staging process of the project, it is possible to use a self-signed certificates. The following information will detail which steps need to be take to use these. Since we have a certificate for the staging environment these steps are no longer required for staging, but can be used if you wish to run the project locally with SSL. These self signed certificates are not signed by a trusted CA (Certificate Authority). Since a trusted CA does not sign these certificates, the browser will give a warning when trying to access the website. This is because the browser does not trust the certificate by default. Not only the browser, but also the back-end modules will not trust the certificate by default. This means that we need to add the public key of the certificate to the trusted certificates of the back-end modules (In the browser the user can click "accept the risk" and the browser will add the public key to the trusted key store).
For a development setup, this means that:
- The BE & Gateway/Nginx needs to trust the certificate of Keycloak. (When using Nginx there is no need to enable SSL for the BE & Gateway, since Nginx will handle the SSL).
- The first time of accessing anything through the reverse proxy, the user will need to accept the risk of the certificate.
Since we no longer require these certificates for staging there is nothing present in the repository for this. However, in order to simply the process of recreating this configuration, there is a certImport.bat file in the keycloak/config/certs folder. In here you can find multiple commands to create certificates, add them to truststores, check its contents etc. All these commands include a comment stating the usage of the command. After creating the certificates and adding them to the trust stores you can add the truststore to the BE & Gateway / Nginx. After that you can follow the steps in the next section to add the certificates themselves (instead of the truststore we just wen over) to Keycloak and Nginx.
📜 Converting Certificates
For production, we start of with having the certificate in a .PFX format. This is a format that holds both the public and private key in one file. In order to use this certificate in Nginx and Keycloak, we need to convert it to the .crt and .key format and PEM respectively.
The first step of this conversion is installing openssl. This can be done using the following command on windows:
winget install ShiningLight.OpenSSL.Lightor Linux (Fedora):
sudo dnf install opensslAfter installing openssl, you can use the following steps to convert the .pfx file to .crt and .key files:
Convert .pfx to .crt During this step you will be asked for an import password (this is the password we receive from Verweijen).
openssl pkcs12 -in [yourfile.pfx] -nokeys -out [fullchain.crt] -chainConvert .pfx to .key You will once again be asked for the import password. After that you will be asked to set a password for the .key file. This password is needed to encrypt the .key file. Save it for the decryption step.
openssl pkcs12 -in [yourfile.pfx] -nocerts -out [privatekey.key]Convert .key to unencrypted .key During this step you will be asked for the password you set in the previous step.
openssl rsa -in [keyfile-encrypted.key] -out [keyfile-decrypted.key]Now you will have a .crt and .key file. You can use the .crt and .key files to create 2 PEM files. Simply copy the Cert and Key files, and change the extensions to PEM. Windows can handle this conversion without corrupting the file. These PEM files are needed for Keycloak. The naming conventions that Keycloak and Nginx expect are:
- Keycloak: keycloakcert.pem & keycloakkey.pem
- Nginx: flowcontrol.crt & flowcontrol.key
📜 Production certificates
For the production environment, we have chosen to use certificates signed by a trusted CA. This means that the browser will trust the certificate by default and will not give a warning. Since these certificates come from a trusted authority, adding them to trust stores is no longer needed. This simplifies the usage of SSL certificates even further.
In order to use the certificates, we need to add them to the right location on the production machine (as long as we do manual deployments instead of via the pipeline). Check the docker compose file for the volume mapping and find the actual location on the VM in the .env file.
Certificate formats
.crt = a certificate file, holding the public key
.key = a key file, holding the private key
.pem = a format for certificate files. Both the .crt and .key files can be converted to .pem (Keycloak needs this), converting is as simple as renaming the file extension.
.p12 = a format of a keystore. This is a file that holds both the .crt and .key files (Used by spring / java applications), it can be created by using the openssl command in the certImport.bat file.
Learned the hard way
It might be that the certificate we receive is signed by an intermediate CA. This means that the certificate is not directly signed by a trusted authority, but by another CA that is trusted by the authority. This opens up the possibility that the certificate is not trusted by default. To ensure that the certificate is trusted, we need to add the intermediate CA to the trust store of the back-end modules. This can be done by adding the file to the trust store using the keytool command. This command can be found in the certImport.bat file.
Take the CACERTS file from your Java installation folder. USe the keytool importcert command to add the .pem file (which includes the whole chain) or the intermediate CA to the trust store. Add file to correct path.
Another possiblity is that the curl command on the staging machine to test if the applciation is live, gives an error stating that the certificate is not trusted. This can also be solved by running:
sudo cp Sectigo_RSA_Domain_Validation_Secure_Server_CA.crt /usr/local/share/ca-certificates/
sudo cp SectigoPublicServerAuthenticationCADVR36.crt /usr/local/share/ca-certificates/

sudo update-ca-certificates
These commands are specific to the certificates of september 2025. If we get another certificate there might be the need to change this accordingly.