Keycloak & Flowcontrol
- TECHNICAL DOCUMENT
- Hormes, Maarten
- 01/01/2023
Glossary
| Term | Meaning |
|---|---|
| Resource server | A server hosting protected resources |
| (Protected) resource | Protected assets of the application. Often used interchangeably with endpoints |
| Scope | Bound extend of access. Often a verb which can be applied to a resource; create, read, update, etc. Can also relate to specific information supplied by the resource. E.g. article-price |
| Policy | Defines a set of conditions that must be satisfied to gain access. Is NOT connected to a resource. E.g. be-admin -> gain access when you are admin |
| Permission | Association of protected resource and the policy that must be evaluated to determine access. Access allowed to ‘’resource’’ for operation ‘’scope’’ when ‘’policy’’. |
| Code verifier | A unique string value created by the client application. Gets send to Keycloak on the token exchange request. |
| Code challenge | A hash and encoded version of the code verifier. Gets send to Keycloak on the authenticate request. |
Introduction
The goal of this document is to inform the reader about the usage of Keycloak to secure the authentication and authorization process of the Flowcontrol system. This is done in multiple ways. The document describes some terminology, goes over the roles in Flowcontrol and which access they have to the article module, the way permissions are used to authorize users and a description of the authorization flow(s). Next to textually explaining how Keycloak and Flowcontrol can interact, there will be sections to describe how to configure the docker container in the docker compose file, the implementation of the custom providers and the configuration performed in the Keycloak admin portal. This document is written with the purpose if informing the reader about the ‘how to’ use Keycloak. An answer to the question ‘why to’ use Keycloak will not be formulated in this document. This can be found in the research documentation of my internship. Configuration of the Keycloak server is version 19.0.2 specific and is subject to change. Information in this document should also be present in the Keycloak documentation, which is at the time of writing this document still outdated.
Docker Setup
The first step in getting Keycloak working is to add an service to our docker-compose file.
Once we have added this “Keycloak” service we can start with the configuration of the docker container.
Most of these values have a comment shortly explaining what they mean. A few things to notice is that:
- At the moment of this snapshot, the custom login and logout pages were not done and the volume pointing towards these custom pages is commented. Before production this should be uncommented
- The first command (start-dev) should be replaced with ‘start’ when going into production.
- The debugging port can be removed in the production version of the docker compose
- The last command should be removed since it uses a deprecated feature
keycloak-service:
  image: quay.io/keycloak/keycloak:19.0.2 #Docker image to use in the container
  container_name: dev.flowcontrol.keycloak #Name of the container, can be anything
  environment:
    DB_VENDOR: mariadb #Use MariaDB as the database
    DB_ADDR: database-dev #Use development db, since this is development docker
    DB_DATABASE: keycloak
    DB_USER: user
    DB_PASSWORD: password
    DB_SCHEMA: public
    KEYCLOAK_ADMIN: admin #username for master realm
    KEYCLOAK_ADMIN_PASSWORD: admin #password for master realm
    KEYCLOAK_LOGLEVEL: DEBUG
    KEYCLOAK_IMPORT: /tmp/realm-export.json #Import file from linux system
    #Below values are used to debug custom keycloak providers while running in keycloak
    DEBUG: true
    DEBUG_PORT: "*:8787"

  ports:
    - "8180:8180"
    - "8787:8787"
  depends_on:
    - database-dev
  command:
    - start-dev
    - --http-port=8180
    - -Dkeycloak.import=/tmp/realm-export.json #command to trigger import
    - --spi-login-protocol-openid-connect-legacy-logout-redirect-uri=true #command to trigger correct redirect url
  volumes:
    - ${KEYCLOAK_VOLUME}/json/realm-export.json:/tmp/realm-export.json #map the file used to import realm to the correct location on the linux machine
    - ${KEYCLOAK_VOLUME}/providers:/opt/keycloak/providers #map the custom providers folder to the correct location on the linux machine
  networks:
    - backend
Custom providers
As you can see in the docker compose file above, I have mapped a volume of providers to the Linux machine. These providers are the so called custom Keycloak providers. These custom providers have a very big range of functionality. For us, the main use case will be the option to create custom required actions. These required actions have to be performed by each user the first time they login. There is also the option to assign these required actions to users after they already performed them. How to set these required actions once they already have been performed will be discussed later when talking about the admin portal itself.
A template for a custom required action can be seen on the next page.
Next to the implementation of the required action, we need an required action factory to inform Keycloak we have this required action, show the correct required action name and call the correct methods in the provider class.
An example that belongs to the above shown required action provider:
package keycloak.requiredaction;

import org.keycloak.Config;
import org.keycloak.authentication.RequiredActionFactory;
import org.keycloak.authentication.RequiredActionProvider;
import org.keycloak.models.KeycloakSession;
import org.keycloak.models.KeycloakSessionFactory;

public class MobileRequiredActionFactory implements RequiredActionFactory {

  @Override
  public RequiredActionProvider create(KeycloakSession keycloakSession) {
    return new MobileRequiredAction();
  }

  @Override
  public String getDisplayText() {
    return "Insert mobile phone";
  }

  @Override
  public void init(Config.Scope scope) {
  }

  @Override
  public void postInit(KeycloakSessionFactory keycloakSessionFactory) {
  }

  @Override
  public void close() {
  }

  @Override
  public String getId() {
    return MobileRequiredAction.PROVIDER_ID;
  }
}public class MobileRequiredAction implements RequiredActionProvider {
//Name of required action
public static final String PROVIDER_ID = "mobile-ra";
//Value of the attribute field in Keycloak
private static final String MOBILE_FIELD = "mobile";
@Override
public InitiatedActionSupport initiatedActionSupport() {
return InitiatedActionSupport.SUPPORTED;}
//Evaluate of user already has filled in the mobile number. If not -> set required action: fill in number
@Override
public void evaluateTriggers(RequiredActionContext context) {
if (context.getUser().getFirstAttribute(MOBILE_FIELD) == null) {
context.getUser().addRequiredAction(PROVIDER_ID); }}
@Override
public void requiredActionChallenge(RequiredActionContext context) {
// show initial form
context.challenge(createForm(context, null)); }
@Override
public void processAction(RequiredActionContext context) {
// submitted form
//Get the current user
UserModel user = context.getUser();
//Take the mobile phone number from the input field
MultivaluedMap<String, String> formData = context.getHttpRequest().getDecodedFormParameters();
String mobileNumber = formData.getFirst(MOBILE_FIELD);
//Check if the mobile number is valid
if (!mobileNumber.matches("^([+]\\d{2}[ ])?\\d{10}$")) {
context.challenge(createForm(context, form -> form.addError(new FormMessage(MOBILE_FIELD, "Invalid input. Follow format: +31 0612345678")))); return; }
//Assign user attribute and remove required action
user.setSingleAttribute(MOBILE_FIELD, mobileNumber);
user.removeRequiredAction(PROVIDER_ID);
context.success();}
@Override
public void close() {}
//Create the form
private Response createForm(RequiredActionContext context, Consumer<LoginFormsProvider> formConsumer) {
LoginFormsProvider form = context.form();
form.setAttribute("username", context.getUser().getUsername());
//Get the mobile number from the user attribute -> required action can be enabled when user already has value
String mobile = context.getUser().getFirstAttribute(MOBILE_FIELD);
//Fill in the mobile number in the input field (only if the number already exists)
form.setAttribute(MOBILE_FIELD, mobile == null ? "" : mobile);
if (formConsumer != null) {
formConsumer.accept(form);
}
//Return form (FTL format)
return form.createForm("update-mobile.ftl"); }}Admin portal
When it comes to configuring realms and clients, Keycloak offers us a admin portal. An UI that can be used to configure realms, clients, roles, users, permissions, etc. This portal resides at the http://localhost:8180. Here we can login to the master realm using the username and password from the docker compose file. This master realm is the default realm created by Keycloak on startup. The user gets to see the following:
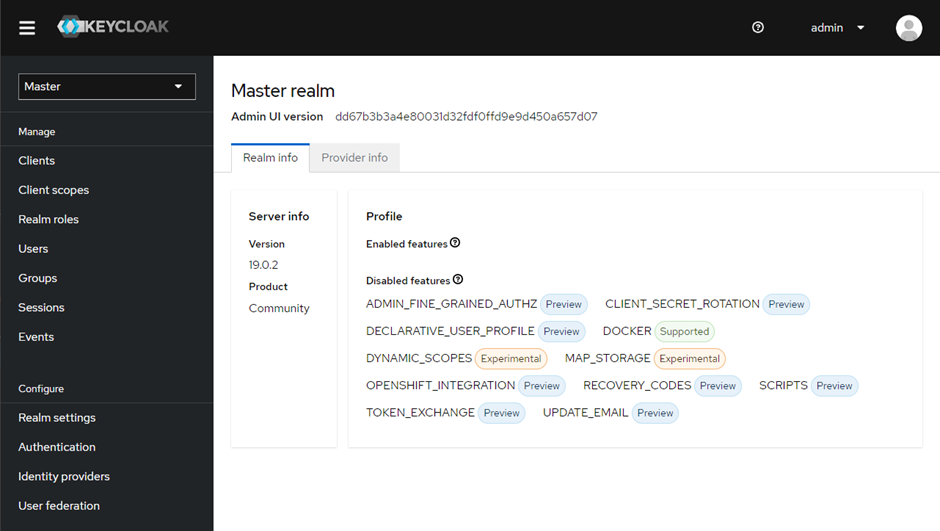
Realm creation
In here we can configure the master realm. Here we have the option to create realms as can seen on the right. This screenshot was made when the Flowcontrol realm was already created. Once we have created our realm, we can select it.
After selecting a realm, the interface will be similar to the above shown screenshot. The menu on the left side is very self-speaking. There is a section for clients, scopes, roles, users, groups, etc. In the Flowcontrol situation, we will mostly be dealing with clients, a little bit client scopes, realm roles and users.
Lets start with creating and configuring a client! 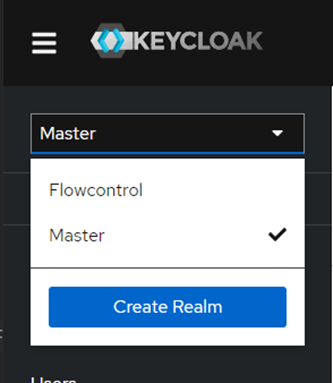
Client configuration
Once you select the clients section from the left side menu, you will be presented the following page:
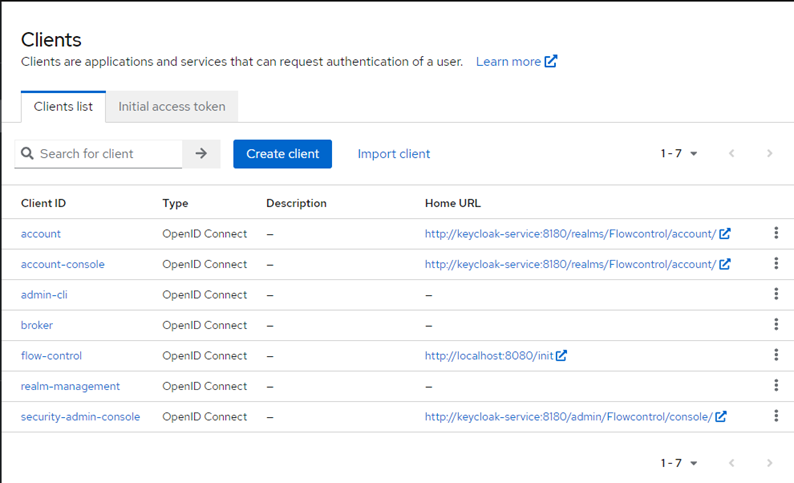
Here we can manage existing clients and create our own. Once again, there is already a flow-control client created. By
selecting the client we get the option of managing its configuration and get to see the following:

Here we can configure the basics like the client name or description and start with defining our security configuration. URL’s like the root and home URL, valid redirect for both login as logout and allowed web origins. All these security configuration speak for themselves and should be inline with the defined configuration of Keycloak in the spring boot application.
ReaKeycloak offers 2 different types of roles.
Client roles and realm roles. One being specific to each client (client roles), the other available for all clients to use. For the Flowcontrol system, we have decided to for the realm roles. This makes later configuration easier when we want to add another client to our Keycloak server. The realm roles page looks like this:

By simply clicking the create role button we can add new roles. Selecting a role lets the user edit it. Once we have created the roles in our system, we would like to assign them to users. For this we first need users.
Users
The user tab looks as following. At this moment I only have 1 user present for testing the application. Every user of the Flowcontrol system will later be present on this page. Once again there is a button to create a user and the option to select a user to update it.
 The selection page looks like this:
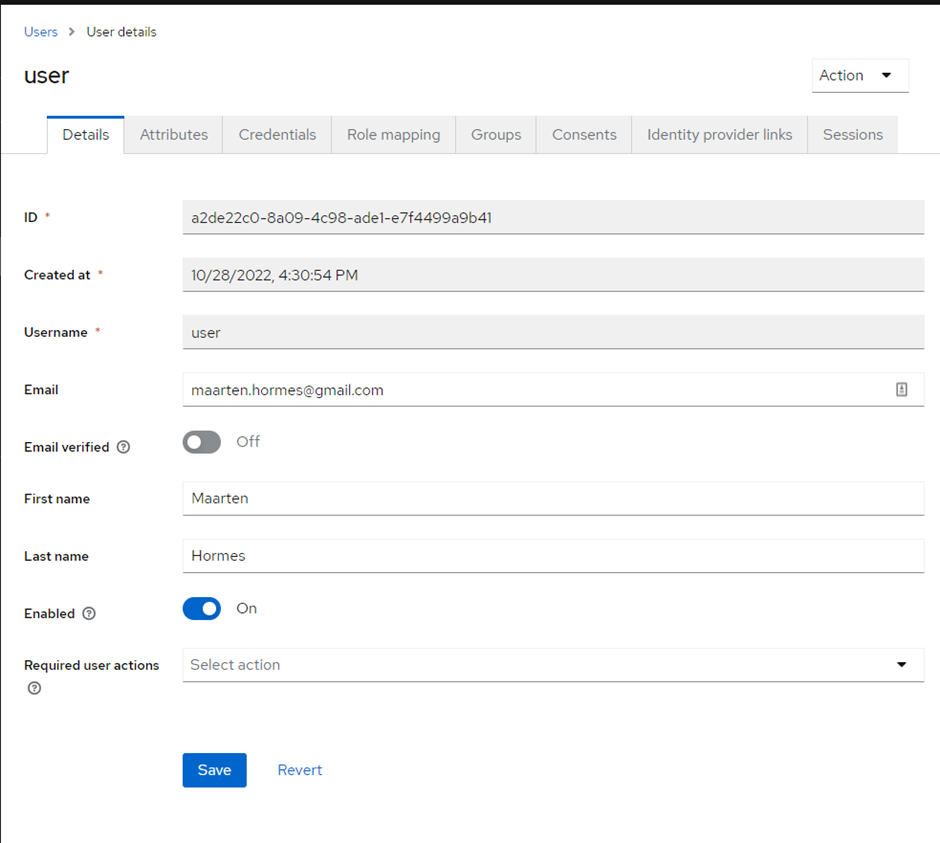
Here we supply simple user information. In the tab attributes we keep further information (includes info coming from the required actions discussed before). The credentials tab allows us to reset the password of this user. It does NOT show the password, this is encrypted and
even hidden from the system admins.
The role mapping tab allows us to map roles to the users. Further tabs are not being used at the moment of creating this file.
INFO
Last notice: There is an option to create custom client scopes. These scopes can be used to include information about the user in the access tokens send from Keycloak. These client scopes should be treated with
caution since they can adjust the mapping of the access token, breaking the front end functionality that is dependent on the access, refresh or id token.
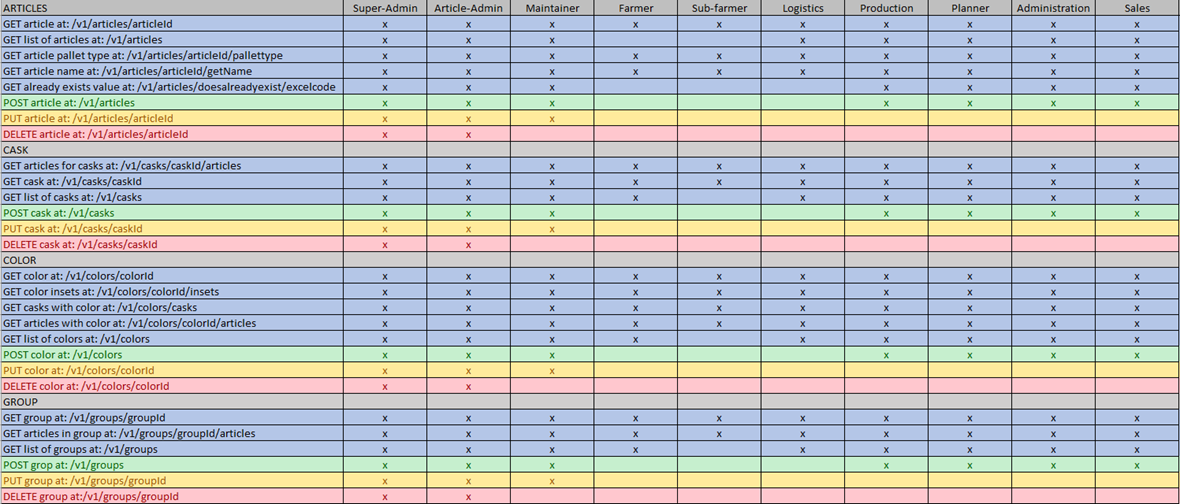
Roles in Flowcontrol
Currently there are the following roles present in Keycloak. These Keycloak roles belong to the Flowcontrol realm. Super-Admin, Article-admin, Maintainer, Farmer, Sub-Farmer, Logistics, Production, Planner, Administration and Sales.
These roles do not reflect the department the user works at, but the permission they have in the Flowcontrol system. This means that e.g. a driver and planner can both have the role Logistics, while the planner will also have role planner. This simply means that this user has permission for both roles.
An excel file is available which holds an overview of what roles are allowed to call each endpoint. An snippet of this file is shown below to give an idea of what it looks like:
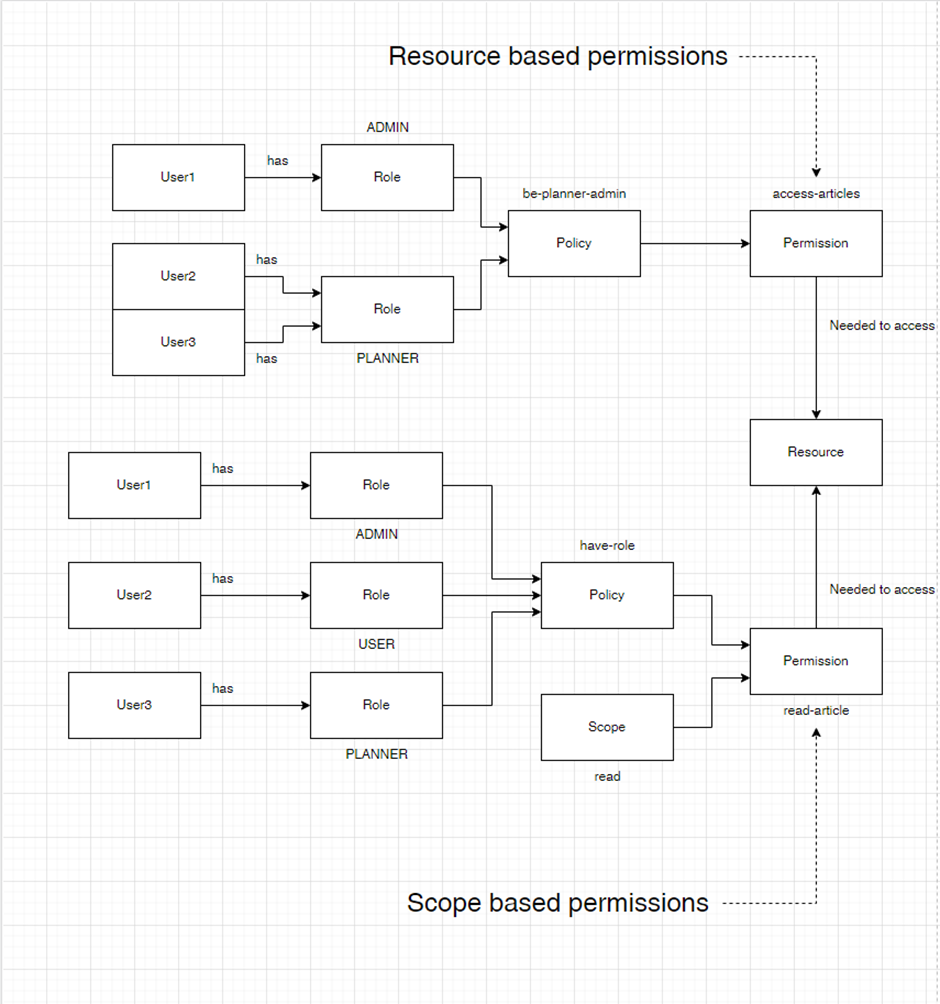
Persmission diagram (No longer present in Flowcontrol)
The following diagram shows how permissions are used to gain access to resources. Keycloak supports 2 types of permissions. Resource based, applied to a complete resource, and scope based, still applied to a resource but only for the action the scope defines.
Next to using roles for policies, there is the option to create policies based on role groups, user attributes, specific users and a whole lot more.
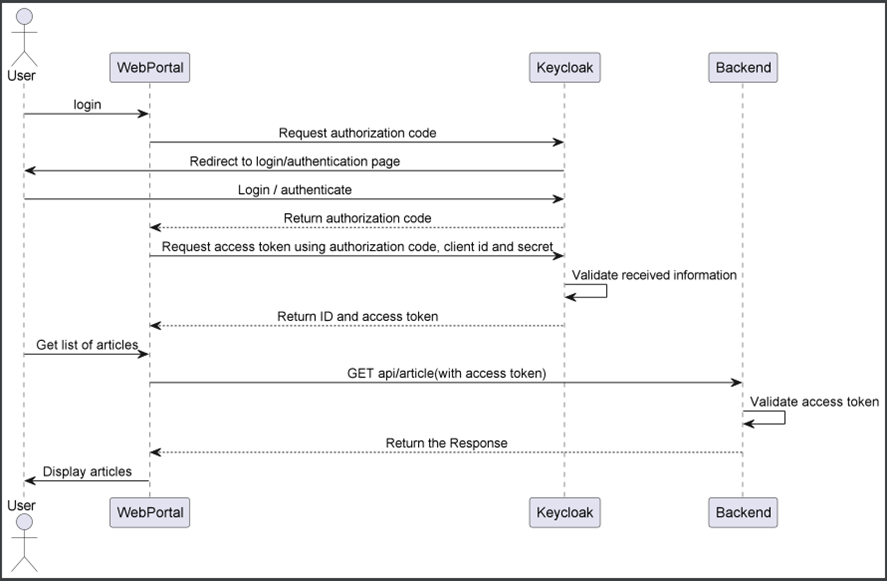
Authorization flow (Authorization code grant)
Below you can find the flow of authorizing a user. In this diagram the user goes through the authorization process to gain access to articles. Everything from Get list of articles and below can vary based on the specific request that was made.
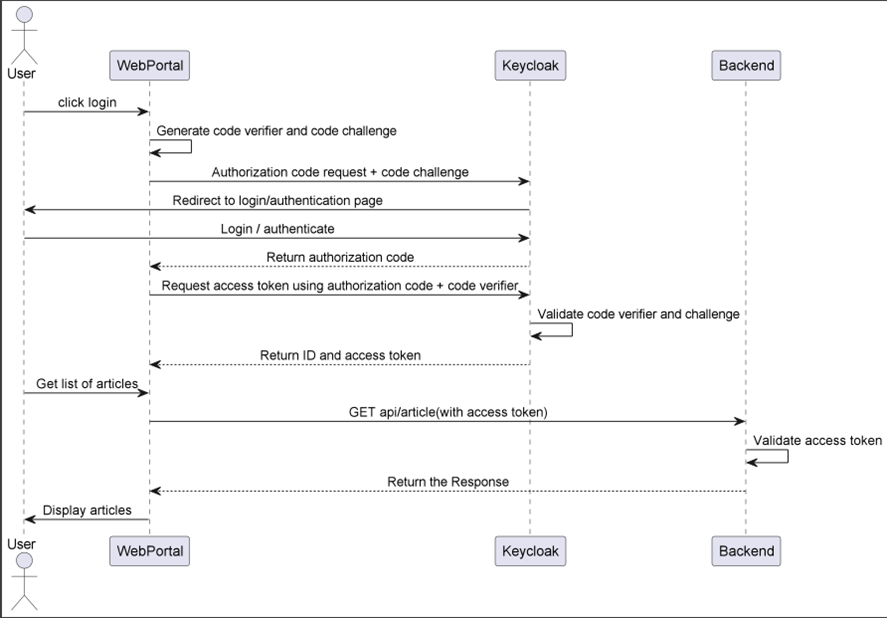
Authorization flow (Authorization code + PKCE grant)
Further information
It’s not a bug, it’s a feature
Make sure the keycloak-providers.JAR file is present in the config folder. Check this folder before launching otherwise keycloak will crash upon trying to use these custom providers
No JAR present? -> Clean / Package keycloak-providers pom.xml to create new target folder which will contain the JAR -> move to keycloak/config/providers folder
Upon pulling from git, remove local keycloak database before running container. Let container recreate database. Without removal, changes in export.json are ignored. Remove DB -> No DB? Rebuild server -> rebuild realm -> use new export.json
First time using keycloak on this machine? Check if the origin, login and logout URI are correctly configured.
Running the FE outside of docker can cause token issuer issues on the BE. Make sure both the FE and BE are capable of reaching keycloak by updating the hosts file in the system32 folder to include -> keycloak-service 127.0.0.1:8180
Meta
Authorization code grant tutorials
Guides for authorization code grant (before in use)
https://www.appsdeveloperblog.com/keycloak-authorization-code-grant-example/https://auth0.com/docs/get-started/authentication-and-authorization-flow/call-your-api-using-the-authorization-code-flow
Information on authorization code + PKCE grant (currently in use)
https://developers.onelogin.com/openid-connect/guides/auth-flow-pkce
Authorization code grant login URLS
URL for getting auth code
http://keycloak-service:8180/realms/Flowcontrol/protocol/openid-connect/auth
URL for getting token
http://keycloak-service:8180/realms/Flowcontrol/protocol/openid-connect/token
Keycloak documentation of JavaScript adapter
Miscellaneous
Keycloak custom login:
https://www.baeldung.com/keycloak-custom-login-page
Command to back-up keycloak database:
/opt/keycloak/bin/kc.sh export --dir /opt/keycloak/data --realm Flowcontrol --users realm_file